Overview
This appendix is the practical reference guide for everything that sits around the main story route. Instead of reading like a spillover page for leftover notes, it is organized as a cleanup and planning reference for players who want stronger preparation, cleaner progression, or fuller completion coverage.
Most of the subjects here become more valuable on return visits than on a blind first pass. Heart Pieces, bugs, bottles, combat techniques, and endurance content all benefit from timing, and the purpose of this page is to help you decide what to chase early, what to leave for a natural revisit, and what to save for a near-endgame sweep.
Existing section anchors are retained so reference links inside the guide continue to land on the intended sections.
General Secrets and Route Advice
Twilight Princess is generous with optional support, but it rewards timing more than blind scavenging. The best optional finds are the ones that reduce friction across multiple chapters: bottles, wallet growth, extra bomb storage, improved combat options, and steady collectible progress in regions you are already visiting anyway.
As a rule, do the obvious low-cost side tasks when the story naturally presents them, especially in hubs such as Ordon, Kakariko, Castle Town, and Lake Hylia. Save the heavier cleanup loops for the middle and late game, once traversal tools have opened enough of the map to make detours efficient instead of repetitive.
- Early priority: bottles, wallet growth, and any reward that improves recovery or resource capacity.
- Midgame priority: Heart Pieces, bugs, and side upgrades that become easier once Clawshot, Spinner, or Dominion Rod access expands the map.
- Late-game priority: Poe cleanup, Hidden Skill completion, and the Cave of Ordeals once your inventory is broad enough to support mistakes.
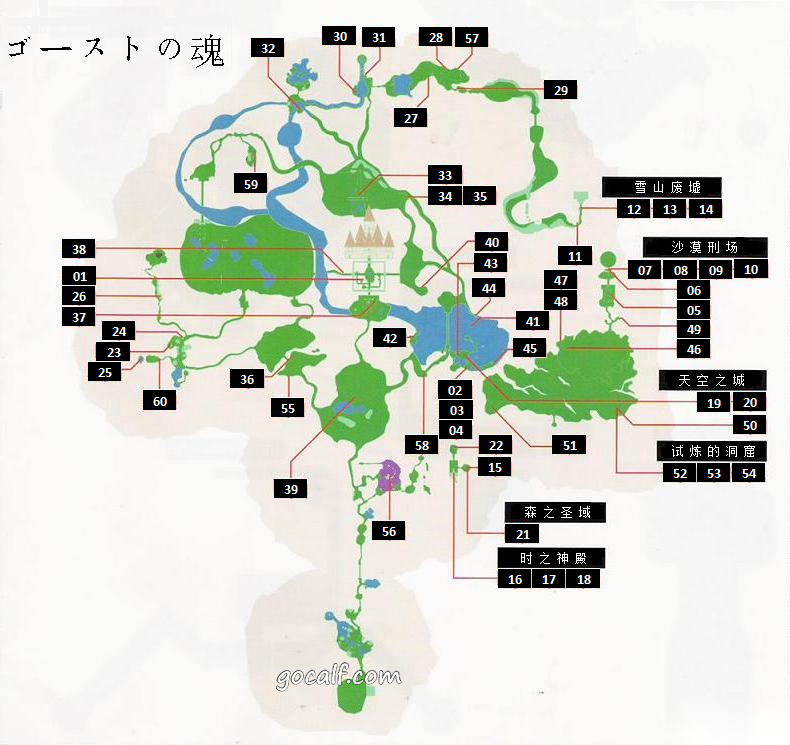
Heart Pieces
Heart Pieces are the backbone of safe completion routing because they steadily turn hard fights and longer dungeon stretches into more forgiving territory. They are scattered across towns, ledges, minigames, caves, and return-route spaces, so the cleanest way to track them is by region rather than by strict story chapter.
Many of the easiest misses happen because a location looks familiar before the correct traversal tool is in hand. Once the Clawshot, Spinner, Ball and Chain, or Dominion Rod opens older spaces in a new way, revisit the main hub regions with health cleanup in mind.
- Check Ordon, Kakariko, Castle Town, and Lake Hylia whenever a new traversal item expands the map.
- Do not assume the obvious health upgrades are all in dungeons; some of the easiest misses are tied to optional minigames and casual return visits.
- A cleanup pass after each major mirror shard is usually more efficient than postponing all health collection until after the final story push.
Optional Items and Upgrades
Optional upgrades in Twilight Princess matter because they remove friction from the exact places where the main route starts stretching out: longer overworld loops, repeat shop visits, ranged encounters, and endurance-heavy side content. Larger quivers, bomb bags, stronger wallets, and armor options all help the late game feel more controlled.
These are best treated as efficiency rewards rather than pure completion badges. If you want the main quest to move with fewer interruptions, invest in storage and economy upgrades first, then add specialty gear once the story begins pushing you across wider portions of Hyrule.
- Prioritize storage upgrades before cosmetic or novelty purchases.
- Late-game convenience often comes from side content that looked minor when it first appeared.
- If you dislike backtracking, collect upgrades when the story naturally sends you close to their regions instead of forcing a separate trip later.
Bottles
Bottles are among the highest-value optional rewards in the entire game because they turn freeform exploration into flexible support. A bottle can hold recovery, lantern fuel, quest items, insects, or situational utility, which means every new bottle reduces how often the player needs to interrupt momentum to resupply.
The first bottle meaningfully changes the early game, and the later bottles are even more important for side content. Poe hunting, Cave of Ordeals attempts, and long cleanup sessions all feel less brittle once multiple bottle slots are available.
- Milk and potions are the obvious uses, but bottles also matter for insects, lantern oil, and several side-quest interactions.
- If you only plan to pursue a small number of optional rewards, bottles should still be near the top of the list.
Hidden Skills
The Hidden Skills are best understood as quality-of-combat upgrades. They are not mandatory in a literal progression sense, but they make repeated enemy encounters cleaner, shorten certain fights, and give the final chapters a sharper sense of mastery than simple button repetition would allow.
Because they arrive over time, they are easy to neglect. That is usually a mistake. Even players who never use every technique in every encounter benefit from having a broader answer set once armored enemies, shielded opponents, or high-pressure late-game rooms begin stacking threats together.
- Treat the Hero's Shade meetings as long-term combat upgrades, not optional flavor scenes.
- Even partial mastery helps; Back Slice, Helm Splitter, and Mortal Draw are especially useful once late-game enemies start defending more aggressively.
- Because unlock timing is progression-based, revisit the training chain whenever the story gives you a natural pause.
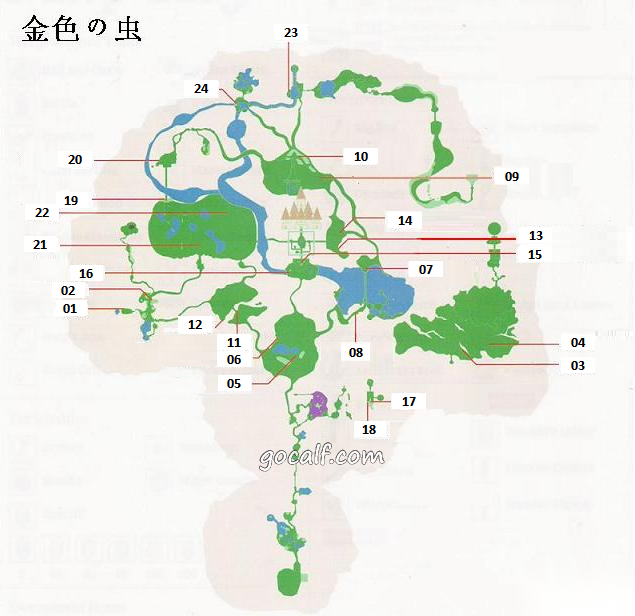
Golden Bugs
The Golden Bug hunt is one of the most efficient side systems in the game because it combines exploration, rupee support, and wallet growth in a single loop. It rewards players who pay attention to small environmental tells and who are willing to revisit earlier regions once new movement options make broad overworld sweeps easier.
It is rarely worth forcing bug collection one specimen at a time. The cleaner approach is to gather them in pairs, fold them into Heart Piece cleanup, and cash them in during natural Castle Town visits so the reward chain supports the rest of the route.
- Collect bugs in pairs whenever possible to reduce unnecessary return trips.
- This side content pairs especially well with Heart Piece cleanup because both reward broad overworld coverage and repeated hub travel.
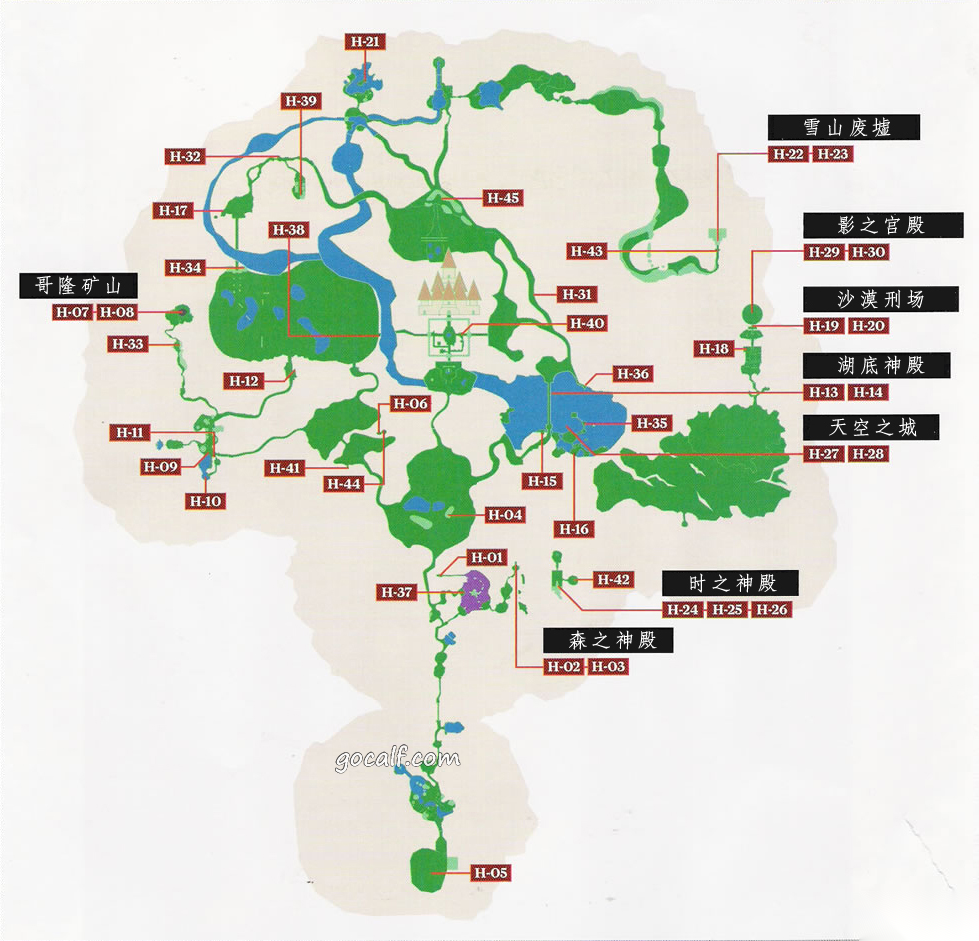
Poe Souls
Poe Souls are one of the least forgiving collectibles to track casually because the story often passes their locations quickly and does not always encourage an immediate detour. The best strategy is to treat them as a regional checklist and clear them in clusters once your route naturally loops back through a province.
Lantern fuel, wolf senses, and time-of-day awareness all matter here, and that makes Poe cleanup better suited to deliberate sweeps than to improvised searching. If a province still feels only partly cleared after a chapter, make a note and come back with intent rather than relying on memory alone.
- Night visibility, Lantern management, and wolf senses all matter for efficient Poe cleanup.
- Use a short regional checklist for Poe cleanup first; the reduced map set below is there to confirm broad search zones, not to replace route planning.
Fishing
Fishing begins as a quiet early-game lesson in item use and local interaction, then gradually opens into a larger optional system with its own pace and appeal. Some players will treat it as atmosphere, while others will use it as a genuine side pursuit between heavier story pushes.
Either way, it works best when separated mentally from the main combat-and-dungeon rhythm. The rod helps the opening hours feel grounded, but the later lure-fishing material is most satisfying when approached as intentional downtime rather than squeezed awkwardly into a busy story route.
- The early rod matters because it teaches item use and supports one of the opening village side tasks.
- Later lure fishing is best treated as dedicated side content rather than something to rush through in the middle of a chapter objective.
Cave of Ordeals
The Cave of Ordeals is not a puzzle dungeon and not a story chapter. It is a sustained endurance check built to test inventory depth, composure, and practical command of the wider combat toolset. Players who enter it too early often experience it as attrition; players who wait until their preparation is mature usually find it a satisfying proof-of-mastery challenge.
That timing is the key recommendation. This is late-game or near-completion content, and it should be approached only after bottles, recovery plans, Hidden Skills, and major item options are all in place. Think of it as the final exam for your optional preparation rather than as a box to tick the moment it becomes available.
- Attempt it after building a healthier inventory, not as soon as it becomes technically available.
- Bottles, armor options, Hidden Skills, and recovery planning matter here more than in most single dungeons.
- Use it as a late-game mastery check, not as a mandatory pacing step inside the story route.
Screenshot Highlights
This appendix no longer needs the full image dump. These four reference visuals are the only ones kept because they still improve planning for health cleanup, bug routes, and Poe sweeps without turning the page back into an archive gallery.